Wednesday, 19 April 2017

Day 29 - Photoshop - English Project (1) - Sprites Front Templates

What I did:
Today, I made the templates for my sprites in Photoshop. I explained the project in yesterday's post so if you're not sure what's happening, be sure to go check that out. Basically, I needed to create sprites for my English project and that's what I did. I started off with making templates rather than downloading templates because I want this to be 100% my work.

1. Firstly, I made a transparent background because I'm going to using the template with a backdrop and I needed it to be its own thing.
2. Next, I created the head using the eclipse tool. 
3. Since, It was hard to see the images with the transparent background, I created a body and added strokes to all the layers.

4. Then, I added the legs and shoes. 


5. Finally, I added the arms and hands and named the layers.

What I learned:
Today, I learned some new things in Photoshop. I learned how to make sprites. I really liked the idea of creating these sprites using the rectangle and eclipse tools. I learned how to create these things and about duplicating. Basically what you want to do is make the body be realistic and proportional to the head. You don't want the body to be much bigger than the head unless you're making an overweight character but I'm just making templates right now so I'm  trying to make an average person. I also learned about duplicating and I duplicated the arms and legs rather than making new ones because they would most likely not be the same size so I just decided to duplicate them instead and it worked out well. 

What I plan to learn tomorrow:
Tomorrow, I plan to continue with the sprites but this time I want to make them facing sideways. Most of the scenes in the book have people moving or shooting so I think it would be good to make the sprites facing sideways as well. I'm not sure if I will use the sideways sprites too much but I just to want make them just in case and keep them in stock. That's my goal for tomorrow.


Time: 40 minutes

Tuesday, 18 April 2017

Day 28 - Sony Vegas - Colour Splashing

What I did:
Today, I learned about Colour Splashing. Colour splashing is used to highlight a particular colour in a picture or video. Today, I used one of my Destiny clips and splashed the red colour on my character's arms. However, the clip has a lot of red so that appears too when my character is moving around but you can clearly tell that it was colour splashed. I added the effect from the "Video FX" option and selected the desaturated except for reds option.I messed around with the tools so it only shows where the that specific colour is. That is what I did in today's class. Unfortunately, The video got corrupted so I only managed to get a screenshot of the colour splash and here it is:


What I learned:
Today, I learned about colour splashing in Sony Vegas. I learned about the colour correction (secondary) option aswell. I learned that you can select which colour you want to colour splash by going to the colour range option and selecting the colour you want to use. Then you can bring down the saturation and make everything else black and white yet  keep the colour you selected visible. I learned that there are many ways to do this and there a lot of different plug-ins you can download to accomplish this. 

1. I learned you can go to the Video FX panel and go down to colour correction(Secondary) and choose one of the options to start colour splashing. 

 2.Next, I learned about the whole selecting a range thing. You click "select range" and go over to your video and select what colour you want. In this case, I chose the red on my character's arms.

 3. Finally, I learned how to bring out all the red. You have to go the width and change it up a bit. You can also go to the saturation and change that too.

What I plan to learn tomorrow:
Tomorrow, I plan to move forward with my English project. It's a project for the book: The Cellist of Sarajevo. Basically, our English teacher is allowing us to do a project on this book and it replaces your lowest writing mark. You can do whatever you want for the project so I thought that I could do it for IT. I can get double credit for it and it involves some of the things that I've already done in the class and blog. I plan to make sprites in Photoshop and use them in Sony Vegas "video" with keyframes and all that will commentary over it. I think it would a great idea and  I also get double credit :P It's going to take a while to do so that's why I'm starting in mid-April even though it's not due until June. I will be noting down how long it takes to do each part and recording it here. That is my goal for tomorrow, to get started with the project.

Monday, 17 April 2017

Day 27 - Sony Vegas - Colour Correcting

What I did:
Today, I colour corrected in Sony Vegas. Colour correcting is a feature used to give a video or picture a more vibrant feel. I have colour corrected in the past with my "Hollywood-izing" clips tutorial but it was a simple colour correction and I didn't go into detail nor did I use the same method. Today, I colour corrected using the video event FX feature and it was really simple yet effective. The colour I chose to do was blue so it gave the video a sad feeling even though it's a gaming clip that I've used before. I used the colour curve which is really cool and simple and I also used the colour correction wheels which I learned a lot about. This is an effect which is definitely be useful when I create my montage in coming months because I need to give it a feeling that matches with the music and since the most of the music is upbeat and "rock-y" I will probably have a red or yellow colour for that but when the song gets slow and sad, I will make it blue or something melancholy.


The VIDEO (Right side is colour corrected and left side is regular):


What I learned:
Today, I learned a lot about colour correcting. I learned that you can do it in many ways and just because something doesn't say "colour correcting" it can still be colour correcting such as the colour curve. I learned that this curve is used for brightening and darkening. I also learned about the colour correction wheels and what each of them do. Finally, I learned about the split screen thing, which allows you to split the screen into two parts. The full details are down below:

1. First, I learned about adding the effects.You need to click on your video and select "Video Event FX." After that, a window pops up that shows you all the effects, if you want to add more than one effect, select the first one and choose "add." Then click on the next one, and select "add" and then "OK."

2, Next, I learned about the Colour Curve. It's used to make things brighter or darker. Originally, it is a diagonal line but you can adjust it. Making the top go to very top brightens the lighter colours while making the bottom of the  line touch the bottom makes the darker colours be darker. 

3. Next, I learned about the colour wheels. The colour wheels are used to give the video and different colour. There are 3 wheels "High," "Mid," and "Low." The High wheel will make the brightest colours change to the colour you choose. The Mid will change the mid colours and the Low will change the darkest colours such as black or dark blue. I used this to make my video blue.

4. Finally, I learned about the split video option at the very top of the interface. This splits the video into two sides and the left side is without any effects while the right side is with the effects such as colour correcting.

What I plan to learn tomorrow:
Tomorrow, I plan to learn about colour splashing. This effect is used to highlight only one thing in a video such as a red dress or blue shirt while everything else is white. I think I will also be using this in my montage but It's just a really cool thing that I want to learn how to do. That is my goal for tomorrow's class.


Sunday, 16 April 2017

Day 26 - Sony Vegas - FINAL PROJECT - Montage (1) - Music

What I did:
Today, I started my main final project for this school year and that is to create a montage on a game known as "Destiny." All the things leading up to this will be included such as the photoshop tutorials that I did back in February and especially all the Sony Vegas stuff that I did last month. So, today, I began it. I will be working on it for the next few months along with my English project that I also plan to do on this blog. The first things I did was a select a song for the montage - I should say music because I don't want to get copyrighted so I'm going to stay safe by using just music. The "song" I chose is "Fire Cross" by Luiza. It's a Final Fantasy soundtrack. Then I added markers to the areas where the music pops out or just a nice spot where a transition would be nice. This effect is used to sync the gameplay with the music so the montage isn't just full of clips and music. That is what I did today to get started with the creation of the montage. Since I have around 2 more months until the end of the school, I thought I should choose longer music for the montage so I chose what I mentioned above. Normal montages are around 3-4 minutes, however, mine is around 6 minutes due to the music which means I will need a lot of time to do this.


1. This first thing I did was add music to the composition.
2. Next, I put markers where there was a pop or nice area to make a transition point with the music. 


What I learned:
Today, I learned a few new things in Sony Vegas. First, I learned that you can mark your timeline in Sony Vegas. Basically, you can either have the video playing or just jump to a certain part and hit the "M" key and it marks that area. I learned that this is used for transitioning or aligning the pop with a gunshot. The next thing I learned is that it doesn't matter where the audio layer is. Normally, I have the audio layer under the video layer because I thought it would just be a black screen because the audio doesn't have a video but it turns out it doesn't matter. As long as there is a video layer, the video will show above the audio. 

I learned that hitting "M" lets you make a mark on the timeline. I listened to the music and hit "M" along the way because I needed to know where the key points were. Some were spread apart because in the music, there is a melancholy tone to it near the middle and then it picks back up at the end so I decided to do it this way. 


What I plan to learn tomorrow:
Tomorrow, I plan to learn how to learn more things in Sony Vegas. I'm not sure if I'll continue with the montage although I do have some clips that I can add to the composition but I think I might learn some new things that I did not about before. My goal is to continue with the montage throughout the months but tomorrow, I want to learn something new in Sony vegas.

Saturday, 8 April 2017

Day 25 - Sony Vegas - Cinemagraphs :(

What I did:
Today, I attempted to make cinemagraphs in Sony Vegas. The reason I say "attempted" is that it didn't work out very well. That part will be explained in the "what I learned" section though. Today, I made cinemagraphs from stock footage I found on youtube. It was Royalty Free Stock Footage so it's fine if I use it and you can find the video here. I used Sony Vegas because that's my main video editing software but it turns out that there might be something wrong with my settings or I was doing something wrong. Sony Vegas is a great software for editing videos and doing voice-overs but there was only one tutorial I could find that involved using Sony Vegas for cinemagraphs and it can be found here. So here's what I did:

1. First, I added the video clip in.

2. Then, I needed to take a screenshot so I could put in a layer under the video and add mask to it.

Finally, I added a mask to the image in "pan/crop" mode and outlined the part that I wanted to be moving during the cinemagraph. 


What I learned:
Today, I learned to never do cinemagraphs in Sony Vegas. It was probably a sign that there weren't many videos on how to cinemagraphs on Sony Vegas. Sony Vegas definitely isn't made for cinemagraphs because it doesn't even have a save as gif option in the save settings. It's mainly for editing videos and not for making gifs/cinemagraphs although it is possible. I learned that the mask tool did not work for me and I'm not sure why that is. When I tried making the mask and applying it, it did not work and the video did not change one bit. This was also an issue back when I tried using keyframes back in my keyframes post on Sony Vegas. Although the failed attempt of making a cinemgraph in Sony Vegas, I learned a lot about it.

1. First, I learned that you need to take a screenshot so it can be used as a mask and bottom layer when you go to the "pan/crop" section.


2. Next, I learned that the dark parts when you make a mask are the parts that won't be moving while the parts that stay the same 

3. Finally, I learned that there isn't an option in Sony Vegas to save as a cinemagraph so you need to use third-party softwares like virtual dub which will let you save a gif.

What I plan to learn tomorrow:
Tomorrow, I plan to learn how to make cinemagraphs in After Affects. It will take a few days since the tutorials are very long. I especially want to learn how to do this because I think it's a really cool effect. It definitely won't be benefiting me in the long run because it's a gif but I think it's a really neat effect that I can have fun with. So tomorrow, my plan is to create a cinemagraph in After Effects. I apologize for not posting regularly but I'm taking calculus and playing badminton at the moment so I don't have a whole lot of time to post on the weekdays but I always manage to get my posts in. 


EDIT (April 15, 2017):
Tomorrow, I plan to continue learning new things about Sony Vegas and maybe even start on my final project. This change of heart comes from realizing that I do not want to do anything with cinemagraphs. I want this blog to be about things that will benefit me in the future and all the things leading up to this will. I am a video creator so I want to learn things that will help me with that. One of my final projects is going to be making a montage and I think I will start that tomorrow and continue to work on it for a few days until I have collected enough information to start my English  project. Tomorrow, I will learn more things about Sony Vegas. 

Friday, 31 March 2017

Day 24 - March Analysis and April Plans

What  I did and learned this past month:
I did and learned a lot of stuff this past month in Infotech 12. I mainly focused on the Video Editing this month and learned a lot of new things. Now, it may not seem like it now, but I plan to use these things I learned in the future coming months. I learned a lot of things this month about editing.

I learned about a new editing software called Adobe After Effects. I learned that It was much different than the traditional editing software like Movie Maker. Unlike Sony Vegas or Movie Maker, After Effects has a lot more utility for exactly that "After Effects." What I mean is that if you want to edit a video that is already made, I would recommend After Effects because it has a lot more utility in that It has a lot more options for editing. However, for the average user that would like to make montages or youtube videos, I recommend Sony Vegas for one reason in particular. You can narrate and use voice-overs in Sony Vegas. I was surprised to learn that there is no voice-over effect in After Effects and that's real big turn off for people that would like to narrate projects. I spent a few days learning the basics in After Effects and even learned how to make my own transitions in there. However, I found out that it isn't the program for me since I'm a commentator more than an editor.


Next, I moved onto learning Sony Vegas things. I am already familiar with Sony Vegas but I only used it for basic editing and I didn't go too much into the whole pro editor mindset because I only used it for splitting, narrating, and fading. However, I learned a lot more this past month about the program. First, I learned about keyframes and transitions in Sony Vegas. Prior to learning this, the only transition I used was a basic fade transition which can be applied differently than blur or flash transitions. A fade can be done in the timeline alone and I learned that to add transitions, you have to go the transition panel and drag them into the clip to apply them. I know this seems weird but I didn't know how to do it before. You can check out my transitions post here. I also learned about keyframes and how to animate a picture. I found this slightly more difficult in Sony Vegas than I did in After Effects but nonetheless I did it. You can find the keyframes post here. Next, I learned how to change the speed of clips in Sony Vegas and it was pretty simple Holding "CTRL" and dragging the edge in the timeline changes the pace of the video. You can click here to get my insight into it. Then, I learned how to motion track. The main thing I learned from this is to not try to motion track a video that has a lot of motion because that's not what motion tracking is for. It's mainly for a zooming out clip where everything the same but it's just zooming out slowly. You can hear more about my motion tracking experience here. Finally, I learned about the Hollywood effect how to do it. I learned a lot about colour correcting and how to add black bars to your videos to give it a cinematic effect. This really helped for future reference and how I plan to bring this together at the end of the year. You can see the Hollywood effect here. That  is what I learned in Sony Vegas this month.

Alright, so that's what I learned this past month. I focused only on VFX (Video effects) because that's the route I am going with this Independent Studies course. Now onto my future plans.

What I plan to learn in April:
So, the whole basics part of my independent studies course is done. These past two months were only there so I could learn new things that I plan to use near the end of this course. I did not originally know what to do in May but since I am taking English 12 this semester, there is a big project that is due in June and I think I've found what I'll be working on this month. For the first little bit of this month, I plan to do some more things with Sony Vegas to learn more about it. I may even plan to do cinemagraphs in April for a bit and learn how to make them. However, near the end of April, I plan to start working on my English project which involves me making an animated video in Sony Vegas. I will create the characters myself in Photoshop and will bring together all the things I've learned in Photoshop and Sony Vegas. The montage will be happening later on after this project but that is my goal for the month of April 2017. I'll see you all around in the next few weeks. Till then, Later.

Thursday, 30 March 2017

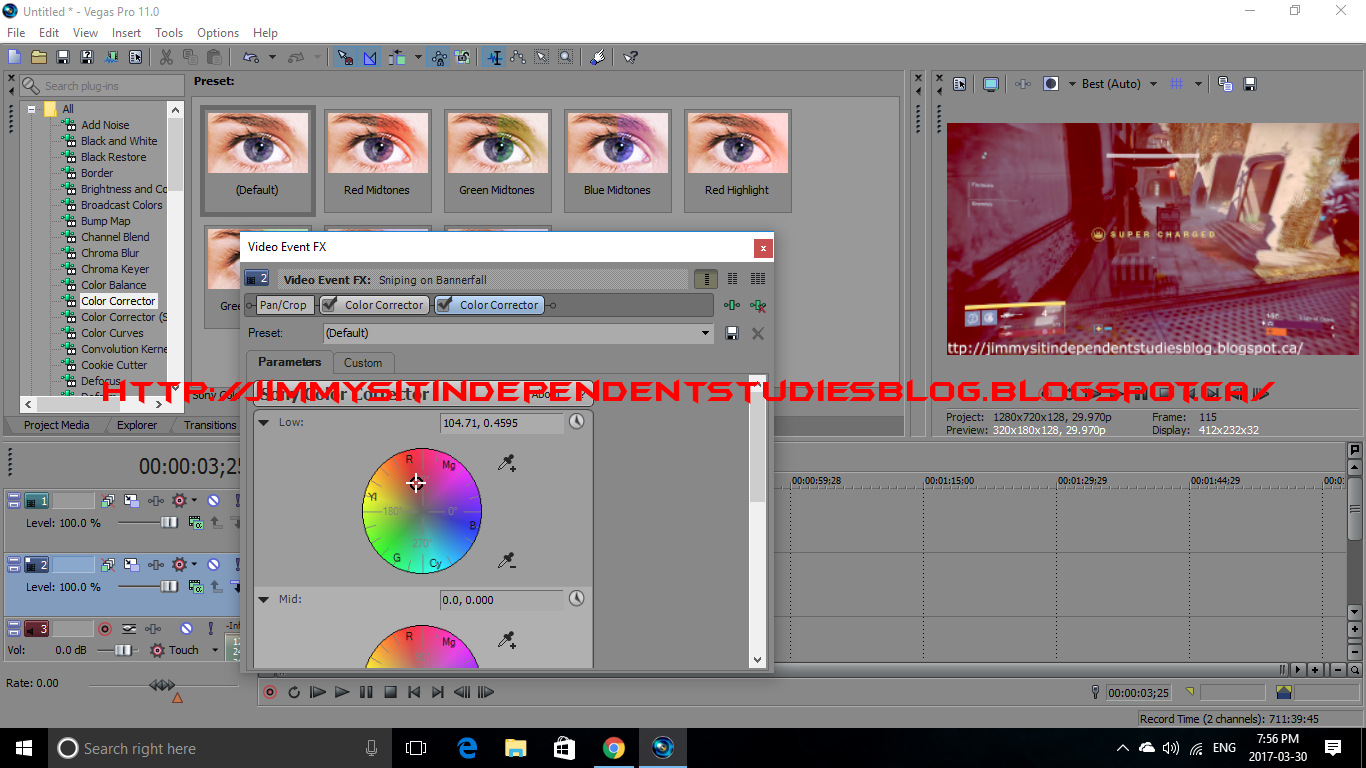
Day 23 - Sony Vegas - "Hollywood-izing" clips

What I did:
Today, I learned how to "hollywood-ize" videos in Sony Vegas. This effect is used a lot by YouTubers when they are making skits or short films. It gives a more of a professional effect on the video rather than an amateur effect. Today, I colour corrected my video and gave it the black bars at the top to give it a Hollywood feel. I did this with a gaming video so it's not as serious as it would be if I did a live action video like a skit or movie. I definitely plan to use this in an upcoming project that I will be doing for another class in the very near future. It will involve a video. Today, I gave my clip Hollywood effects

Before Hollywood Effects:
After Hollywood Effects(Music: Beautiful Mind by: Travis King):


What I learned:
Today, I learned a lot of new things about Sony Vegas and how to add Hollywood effects to your videos. It was very helpful future projects and skits that I might end up doing. I learned about Video FX and how I can colour correct and I also learned how to add the black bars to give it a movie/cinematic feel. 

1. First thing I learned was colour correcting. This is used to make a scene look more vibrant and it also gives a clip a more professional feel. You have to go into "Video FX" at the bottom near the timeline and then select "Color Correcting" (I know, those Americans with their no U's in colour). There are a few options in which you can pick. Then you can choose what colour is going to "overlayed" on your video. It's not necassarily an overlay but it does coat the screen and you can change it so it covers it more with colour or you can try to make it blend in so one notices. 


2. Next, I learned about the black bars. You can easily do this by going into the "Video event pan/crop" section and deselecting the two options to the right in the picture. Then, you move the selection arrows at the top and adjust it to where you like the black bars to be. Moving it too much will result in having more black and slightly moving it causes it to have a cinematic feel.


What I plan to learn tomorrow:
Tomorrow, I plan to begin Cinemagraphs or start one of my final projects. All these tutorials that I have done in the past 2 months will now be able to come together in one project. I plan to make a cinemagraph or start working on an English project involving sprites and videos. Basically what i've been doing for the past 2 months will be worth it. However, tomorrow is the day of the analysis report that Mr. Bilesky would like us to do every month. A lot more will be explained in tomorrow's post and what my future plans are going forward.