Sunday, 26 March 2017

Day 20 - Sony Vegas - Keyframes and Transitions (2/2)

What I did:
Today, I continued to learn more about Sony Vegas but I decided to focus more on transitions today. Today, I put two clips back to back and I decided to test out some transitions. It's quite simple to add transitions in Sony Vegas and you do not need to create them like you did in After Effects. All you have to do is go transitions and then just drag them to where the clip ends or starts and voila, you have your transition, There is also a library of effects to choose from so you shouldn't have a problem selecting which one you want or you might have a lot of problems because a lot of them are great and there are too many to choose from.

The transition in video form (it happens at 23 secondsish):


What I learned:
Today, I learned how to apply transitions to your videos. It was quite simple. All you had to do was just drag and drop the transitions to the start or end of your clips. You can even decide how long you want the transition to last and how it affects the video. What I mean by "affects" is that if you're using a flash transition, you can decide how long you want the flash to last and you can also decide how bright or dim the flash is. 

1. First, I set up the clips and learned where the transition folder is, it right above the timeline at the bottom. 
2. Next, I saw the sheer amount of transitions available. There are so much more than this. As you can see, there are folders to left and each folder has quite a few transitions. I learned about dragging and dropping in this section as well.
3. After that, I learned about editing the transition and I'm not just talking about how long it is. I am talking about editing the amount of distortion during the transition. After you add the transition, a panel opens up right in the middle and you can decide how much you want to edit it, it's pretty straight forward. 


What I plan to learn tomorrow:
Tomorrow, I plan to learn how to slow down and fast forward a clip. I want to learn this because it can add a comedic effect to a video. I also want to know how people do the timelapse in TV shows and movies, where a camera is just recording a city in the same place for hours but they speed it up to show the cars moving and the time of day changing. I think this will be a good thing to learn tomorrow. I knew how to do this on Movie Maker but I do not know how to do this on Sony Vegas yet  and that's what I plan to learn tomorrow. 

Thursday, 23 March 2017

Day 19 - Sony Vegas - Keyframes and Transitions (1/2)

What I did:
Today in Independent Studies, I learned how animate and use keyframes.I also added a gausian blur in the animation itself. So, basically what I did was I added a text layer(with my url obviously ;)) and then I decided to keyframe it. I made sure the first, 2 seconds or so were the seconds of the text when the text would be moving and since, I wanted to give  it a speedy effect, I also added a gausian blur so it has a speed effect. However, the actual video itself has the speed effect slowed down a lot and think it's because the 2 seconds I spent are way too long for it to be effective but nonethe less here it is.

The Video:
What I learned:
Today, I learned some really helpful things in Sony Vegas. I learned about Keyframes and animating and also a little about transitions. I learned that after effects is easier with keyframes and animating but Sony Vegas just reigns supreme at everything else.

1st. I created a text layer above my video layers. 
2nd. I went to "Video Fx" and it gave me this panel. This panel allows me to move text and animate it through keyframes. I learned that you can use keyframes in this. 
3rd. I learned you can move text by moving the text layer to the side and inserting a keyframe and then moving it back. It is really helpful and you can view it later too. 
4th. Next, I learned about transitions and effects. I added a speed effect in that I gave a part of the layer a gausian blur. I only applied it to the part where it is moving so it looks like its speeding. I learned that you can add these effects just by dragging them into the layer.


What I plan to learn tomorrow:
Tomorrow,  I plan to learn more about the transition aspect of this. Today, I mainly just focused on the keyframe and animating aspect of sony vegas. I still need to do more transitions. Transitions in that how the clips change instead of just a jump to the next. I normally do fade transitions but I would like to learn how to do other ones such as a clock transition or a pixel transition just for future reference and maybe for the montage that I plan on making in June. My goal for tomorrow is to focus on transition.


Tuesday, 21 March 2017

Day 18 - After Effects - Transitions

What I did:
Today, In after effects, I learned how to make transitions. Not how to ADD transitions but how to MAKE them because it turns out.... you can't add any transitions because there aren't any to my knowledge. I searched many videos in hopes to come across some that would have default transitions that you could add but it turns out you can't and you have to make them. So, that's what I did and it's actually a time-consuming task that could take seconds if they were default but since they aren't, they can take a few minutes to add. Today, I made a transition that takes a third of the top of the video and moves it to the left, the middle is moved to the right, and the bottom is also moved to the left. It's a simple transition that Sony Vegas most likely has in the defaults but After Effects doesn't.


This transition looks like this:


1: First. I set up two clips for the transition. The second clip started during the first clip but nearing the end  of the first clip so I could do the transition into the clip. 
2. Next, I needed to select the rectangle tool at the top to create the 3 shapes but they also needed to be in mask form so it doesn't cover up the rectangle with a solid colour but rather is transparent.
3. Then I created the rectangles. I tried to make them even but I think the middle was the biggest.
4. Finally, you have you have to create keyframes and make the rectangles move. You can double click the top of a rectangle and then hold shift and move the rectangle to your designated time.

What I learned:
Today, I learned some new things in After Effects. The main thing I learned was that After Effects doesn't have transitions and that you have to make them. I searched so many videos and all they showed was that you had to make the transitions instead of applying them. I also learned about masks. I originally was creating rectangles with a solid colour and even when I turned off the colour, I didn't get the same rectangle colour which was yellow. I didn't know what a mask did but now I do. A mask is basically a transparent thing that can be used with rectangles or other shapes. It helps with transitions in that it moves the thing over when you use keyframes and designate the section. 

What I plan to learn tomorrow:
Tomorrow, I plan to learn about keyframes on Sony Vegas. Since, After Effects is lacking in many editing software essentials so I will use Sony Vegas for the majority of the video editing things I need to do. Also, I have been using it for years and am very familiar with it but I still don't know how to do a lot of the stuff. I've only really used it for simple editing and haven't gotten into too much of it. So, tomorrow I will learn about animating and key frames.

Sunday, 19 March 2017

Day 17 - After Effects - The Basics (3/3)

What I did:
Today, I finished up learning the basics in Adobe After Effects. I continued with the composition that I've had for the past few days and today I decided to learn how to add text. So, I added text to the composition in a unique sort of way so I wouldn't have to go into photoshop to actually put the text in. I also created a sort of vignette/portrait effect by black the sides so it looks framed. This effect can be used to give sort of a classy or picture effect. Finally, I learned how to split a video and the process is much different than in Sony Vegas.

Adding text:

Vignette Effect: 

What I learned:
Today I finished up learning the basics in After Effects. I learned how to add text, how to create a frame, and how to split a video. However, I also learned that there isn't a way to actually do a voiceover in after effects. After Effects doesn't have an option to do voiceovers and that really is a turn off because a lot of videos I do have voiceovers and After Effects doesn't provide that. However, I also learned that there is a way to do a voiceover but it's not in After Effects. You need to use an exterior program to record the voice over and then import it into After Effects and finally match up to the video. This is not something that I am fond of doing so I am going to be editing my YT videos in Sony Vegas.

1. I learned how to create text in After Effects. All you need to do is go to the top and click the giant "T" for text and create text on video. You can also select some text in the same layer and resize it. You could resize text in editors obviously, but After Effects allows you to select specific text in the SAME layer and do it.

2. Then, I learned how to create a vignette. First, you have to create a solid which is just a box around your video that allows you to fill everything in with a specific colour. Since I wanted the vignette to be black, the solid I created was just black. Then, you go up to the rectangle tool and select the eclipse tool to make the round version. You can select rectangle if you want a rectangular portrait. Then you, right click on vignette layer and select "subtract" which allows the edges to be blacked out rather than the circle in the middle. Then you can also move and distort the frame to your liking. 


3. Finally, I learned how to split a clip and the process is much different than in Sony  Vegas and I definitely do not like it. All you have to do is press "Ctrl" + "Shift" + "D" and it splits the clip at that point. Now, pressing those keys isn't that difficult but what happens is kind of weird. After you split, the left side of the split goes down to a different layer and I don't like that because in Sony Vegas, it all stayed in one layer but this doesn't so you have line up all the clips you want rather split and deleting the clips you didn't want. This is also another reason that I will stay with Sony Vegas while editing videos. Maybe there is a fix to this but I haven't found it. If I come across it, I will update you in a future post. 


What I plan to learn tomorrow:
Tomorrow, I plan to learn about transitions in After Effects. I would have liked to start on cinemagraphs but I do not have a tripod nor do I have  any sample clips that I can use. I ask my teacher about this when I get back or maybe email him in the next few days. Tomorrow, I want to focus on transitions because even if I can't voiceover in After Effects, I can still create a montage and I've seen that After Effects has some really amazing "after effects" (get it, cuz After Effects). That is my goal for tomorrow.

Saturday, 18 March 2017

Day 16 - After Effects - The Basics (2/3)

What I did:
Today,  I went on in learning the basics of After Effects. Today, I added an animation to the picture so now I know how to make the watermark move around and I can use that for comedic effect if I ever feel like it. I also added effects to the composition such as adding a blur and a glow. I also learned a lot more about shortcuts and how to use them to maximize time efficiency. There are many ways to do certain things in After Effects but you can do the exact same thing in less time if you know how to.

Adding the glow:

Making the keyframes and animating the picture:

What  I learned:
Today, I learned many new things about After Effects. I learned how to make a picture move, how to immediately import the picture into your composition, how to add effects to your videos, and how to change up the effects. These things that I learned today will help me in getting better with after effects and they will improve future videos I make if I decide to use after effects to edit them.

1. I learned how to immediately import the video from the project section to the composition without having to drag it into a new layer. All you have to do is hold "Ctrl" and "?" to put the picture in the middle of the composition. 
2. Next, I learned about keyframes and how to animate a picture. After you insert and resize a picture to your liking you can animate it by, first, selecting the stopwatch key right next to the picture in the timeline. It will appear next to "position" or "scale" in the timeline. Then you can move the picture to where you want it to go and it will automatically create a keyframe. You can move the keyframe to change how fast the picture will move if you want.
3. Next, I learned about effects. There are many effects in after effects that you can add to your video to give it a special touch if you please and there are many places where you can go to select the effects. You can go to the top and click on effects but there's an easier way in that to the right of the composition box, there is another box that lets you type in effects that you want. This makes it so much faster and easier to access effects. I decided to add the blur effect first and you can do that by typing in "blur" and it will give you options. I selected "box blur" and dragged it into the video section and it looks like this. 

4. Finally, you can decide how much blur you want by going to radius section and typing in a number. To add another effect, you can just type it in and drag it under the previous effect that you had which was the box blur for me. I added the glow effect as well as you saw earlier in this post.

What I plan to learn tomorrow:
Tomorrow, I plan to continue with the basics. Tomorrow is basically the day, I learn what there is left to learn about creating videos like I do. So, I plan to learn about voice overs, text, splitting clips, etc. There are still things like masks that I need to learn as well. I want to learn these things because I've heard that after effects is better in some ways than Sony Vegas at editing so if I find out how to do some of this stuff, I will gladly switch over to this program but I am much to familiar with Sony Vegas to make that call right now. 

Friday, 17 March 2017

Day 15 - After Effects - The Basics (1/3)

What I did:
So, today I learned how to use some of the After Effects tools. What I did today was that I imported my video into the project and I learned that there are many ways to do that as well. I also learned how to add a watermark or picture to your video and I found out that is way easier in After Effects than it is in Sony Vegas to add pictures in. I also learned how to create a composition and it is very different than in Sony Vegas as well. Finally, I learned how to reposition and how to resize the picture that you add to your composition through different methods.

What I learned:
I learned many things today in After Effects. I learned some of the basics but not all of them. It will take a few more days to learn all of the basics that I think I need to have to use After Effects. Today, I learned how to import clips and how to create a composition. I also learned how to reposition and resize photos that you would like in your video.

1. First, I learned how to import clips. There are many ways to import clips such as going to the import menu, or dragging clips from your documents into the project section but I found the easiest way to import clips was to double click the the project box and search for your clips in your videos.

2. Then I learned how to create a composition. Creating a composition is easy in that all you have to do is drag your video from the project section into the small composition box at the bottom. 

3. Next, I learned how to add photos to the composition and how to resize them if you want the pictures to act a watermark. First, you take the picture from the project section and then you drag it down to the timeline where your video is. You need to place it on a layer above your video layer so it actually displays the watermark. You can resize the picture by going to the edges and using the "arrows" on the sides to make it smaller or bigger. 

4.  Finally,  I learned that you resize and reposition the picture without going on the visual composition. You can resize and reposition by clicking the picture layer and pressing "S" for scaling and pressing "P" for position. By doing this, you can put in numbers to resize to your leisure. This method also helps by keeping watermarks at the exact same location and keeping them the same size for future projects.


What I plan to learn tomorrow:
My plans for tomorrow's class is to continue with the basics. Since this program is not made my Sony, it is very different than what I'm used to which is Sony Vegas. I still don't know how to split the clips easily like in Sony Vegas so I hope to learn that in next few days. I do think that the basics will take me a  few days to actually finish because there is a lot of stuff to learn and a lot of basics to cover. See ya tomorrow!


Wednesday, 15 March 2017

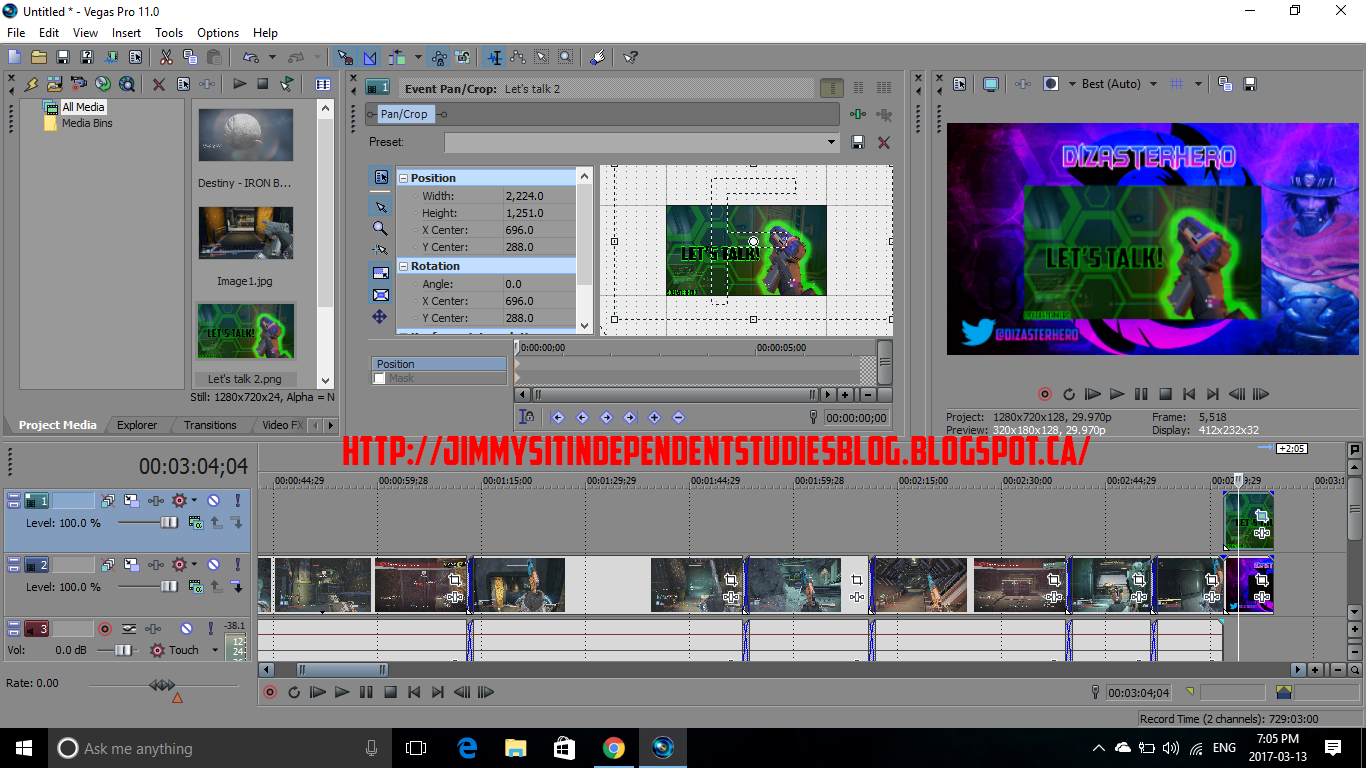
Day 14 - Sony Vegas - Transitions and Finally using the outro.

What I did:
So, today I used Sony Vegas. My original idea was to learn how to use After Effects but my plans have changed. I will use Sony Vegas and After Effects but today, I am using Sony Vegas to learn a few things that I wanted to learn. After Effects will be used tomorrow and in the future. My future plans are to make gifs and cinemagraphs in April and in the middle of April to the end of May, I plan to make a video for my English class project which will be explained in the monthly post. Now, today in Sony Vegas, I used crossfade transitions and after all these years of editing videos, I finally learned how to make them. I've always wanted to do these transitions rather than the fade out and in but I never knew how and I finally, went out and learned how. I added an outro to my video. I've only done outros before in different programs but today, I learned how to do it in sony vegas and it is really simple.

Since It would take a while to upload the video on blogger, I uploaded it to my Youtube Channel.
All the clip transitions are using the crossfade transition and it just looks really smooth.


What I learned:

Today, I learned a lot of stuff while using Sony Vegas Pro 11. I learned a lot of new stuff like how to crossfade and how to add an outro to a video. Last time, all I did was add it with a different program which was pinnacle studio 14 which isn't a very good editor. However, this time I added it with a Sony Vegas and it is really simple and easy to do. The crossfade is a really nice fade which allows a clip to smoothly transition into the next clip. I really liked and you can check it out on my channel.


1. Adding the crossfade. So, I learned how to crossfade and it is pretty simple. All you have to do is take a clip and drag it into your other clip. However, you only want about a 1 second transition because if it is longer, it can make your clips look really weird and unprofessional because they will be overlapping each other.

2. After that, I added the Outro. It involved adding the actually outro at the end of the video. Then, getting my other picture and placing it on an upper layer above the outro in the same timeframe and then minimizing it so, the video is in the outro. To minimize the picture, you have to go to the media fx option which you get my right clicking the thing you want to minimize.


What I plan to learn tomorrow:
Tomorrow, I plan to learn how to use After Effects. I've learned that there are many ways to learn how to make cinemagraphs and after effects is one of them. I plan to learn the basics first and then move onto making cinemegraphs in many different programs such as photoshop, after effects, and sony vegas.